Pages

Thursday, April 28, 2011

Smoothies

Lately I have been making smoothies for my family to drink.  I have been using frozen and canned fruit from our orchard.  I don't use a recipe as such but here are some of the results.

In the blender toss in fruit of your choice - here I am using unsweetened frozen raspberries.


Next add fruit flavoured yogurt that goes with your choice of fruit.  I used raspberry this time.


Add some ice cubes.  I add a glass or two depending if the fruit is frozen, cold or warm.


Add some liquid.  (I use vanilla soy milk but you could use milk or juice as well)  If you use fruit in juice or syrup you may not need any other liquid.


Blend until ingredients are mixed and smooth.


Enjoy!  :)


I use different fruit that I have on hand.  I add bananas if I have them. 
I've used home-canned peaches (I use a lighter sugar-syrup) with peach yogurt.


Apricot puree goes great with mango yogurt.  The puree was frozen when I made apricot juice and I froze some puree to use in baked goods.  I haven't used any in baking because it is so good in smoothies.


Canned plums (pits removed but skins on) with fieldberry.


Leftover canned pineapple with strawberry yogurt.


Frozen pitted cherries with black cherry yogurt.


The list goes on and on and you can change your yogurt flavours as well.

Once the fruit is ripe, I will be using fresh fruit again.

Bottoms up and enjoy!  :)


Monday, April 25, 2011

Apricot Blossoms

Spring has been late arriving this year.  We have had cool, rainy weather with an occasional snow flurry thrown in.  Last week we had a +17C day following by a rainstorm that woke me during the night by pounding on the shed roof.  The next morning we were surprised to find 2" of snow on the lawn.  The bulbs are late blooming and the trees are late leafing.

Apricots bloom before they leaf out.  It is exciting to see a tree filled with blossoms.  They are nicely scented as well which is more than welcome after a winter with no blossoms and garden scents.

This year we had a -6C night after many of the apricot blossoms were open.  It didn't damage them like it does peach blossoms but it did make them look a little worn and weathered.

Here are a couple of pics from 2009 to show how full and pretty the apricots blossoms can be.  (I didn't snap any pics last spring of the apricot trees in bloom.)


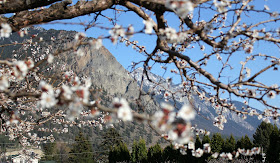
Here are some pics of this year's crop of blossoms.  Notice the difference in the petals and how the blossoms look flatter and more spread out.


Also notice how the flowers have a brownish tinge to them.


In the last few days we have heard the bees buzzing in the trees so they are getting pollinated.


I guess time will tell how good of a crop of apricots we will get this year.  


Thursday, April 21, 2011

Swedish Thin Bread

Another Swedish recipe I learned from my mother-in-law is Thin Bread. 


My in laws were a farming family and ate hardy meals both at lunch and supper.  They always had bread, buns or thin bread with each meal.  The buns and thin bread were warmed in the oven if they had been frozen so were always eaten warm with butter melting on them.

The Thin Bread recipe I am including is from Treasured Recipes - 70th Anniversary of the Bethesda Lutheran Church - 1911 - 1981.

To make the thin bread you need a special roller or can use a fork to prick the dough.  Here is my regular rolling pin and my thin bread roller.


Notice the "nubblies" (I don't know what they are actually called but nubblies seems like a good word) on the surface of the roller.


Ingredients
3 c flour
3 c whole wheat flour
1 c marg
1 tsp baking soda
1 tsp salt
2 Tbsp sugar
(I use 1 1/4 c half and half and 1 1/4 c water instead of the following)
1/2 c cream 
1 c water
1 c buttermilk

Mix dry ingredients and cut margarine in, as for pie crust.  Combine with liquids and mix as dough.


Cut off small portions of dough and roll into a small ball.   This recipe makes about 12 large pieces so you may want to cut it into 12 before you start rolling them out.  You can make smaller pieces if you wish as you usually break off a piece to eat anyway.


Place on floured board and roll very thin.  Flip the dough and add more flour to the board as needed.  I don't get too concerned with odd shapes unless they don't fit on the cookie sheets.


Use a "thin bread" roller, or if you don't have one, prick entire surface with a fork.


I make several passes with the roller so there are lots of holes.  I usually flip the dough over and use the roller on the other side as well.


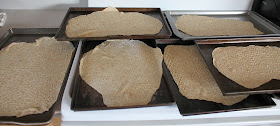
Place on ungreased cookie sheets.  I use all the cookie sheets I have and fill them all before I start baking them.


Bake in a hot oven 375-400F.  The cook time is between 5 and 10 minutes depending on the heat of the oven and the thinness of the bread.  I often flip them over once they start to bake.  You have to watch them carefully so they don't burn.


Set out to cool if you are going to freeze them.  When I freeze them, I place them either in a large plastic container (but that takes so much room) or in a large plastic bag and make sure they are on the top so they don't get crushed.  I usually don't freeze them, though, and we have a feed of thin bread for a few days.


Eat warm slathered in butter.  You can eat with a meal in place of bread.


We like ours as a snack sprinkled with sugar and cinnamon.


Enjoy!  :)

Monday, April 18, 2011

Dormant Spray


We spray our fruit trees and rose bushes in the spring with dormant oil spray.  The timing is tricky because you need to spray before the buds open so as to not damage the new leaves.  You do not want to spray when the blooms are out (some fruit trees bloom before they leaf out) because you can harm the bees.  On the other hand, you do not want to spray if the temperature is below 65F.  You also need a calm day with little or no wind.  And last but not least, you want the weather clear for at least 8 hours after you spray so the rain doesn't wash the spray off the trees. 
We use a combination of lime sulfur and horticulture oil that is considered organic.  Lime sulfur is a fungicide and also kills mites and insect eggs that have over-wintered on the tree or rose bush.  We follow the mixing proportions on the bottle. 

We sometimes use store-bought horticultural oil as well.  The oil smothers the eggs of insects such as aphids and leaf-rollers.  It also kills scale insects and mites.


Most of the time, however, we mix our own oil.  We use 1 Tbsp of cooking oil


And 1 tsp of dish detergent in a gallon of water.  We mix up the lime sulfur, oil, soap and water in correct proportions and pour into the sprayer.  You start at the top of the tree and spray all the bark on the branches and trunk.


The first year we used this sprayer but it was too small for the number of trees we have.  We wore ourselves out pumping.  You have to push the handle on top, up and down to build up pressure.  Plus it didn't hold very much so you wasted alot of time mixing.


Last year we used this sprayer.  It is carried on your back and has a longer handle so it is easier to pump up the pressure.  It holds more volume as well so you don't have to fill it as often.  The down side is the weight on your back while climbing up and down the ladder.


This year we got this sprayer.  It runs off a battery so no pumping.  Usually you would put it on your quad and drive around and spray.  We don't have a quad and it would be impossible to get to all the trees with a quad anyways.  The guys rigged up a board on the wheelbarrow for this year and it worked fine enough.  We are going to try to find a wagon that will hold the tank and we can pull it around the yard.  The pressure on this tank was great so very little ladder climbing was necessary.


Thursday, April 14, 2011

Sourdough Cheese Biscuits

These are my absolute favorite biscuits.  They are soft and tasty and stay soft the next day.  I always double the recipe and we eat the leftover biscuits cold.  The original recipe came from Robin Hood Sherwood Recipes.

Ingredients (for a single batch)
1 c flour
1/2 tsp baking soda
2 1/2 tsp baking powder
1/2 tsp salt
1 c grated cheese (I usually use cheddar but have made them with mozza or swiss)
1/4 c parmesan cheese
1 c sourdough
1/4 c oil


Combine dry ingredients and cheeses.


Add oil and sourdough.
HINT:  measure the oil first and cover the inside of the measuring cup with oil.  Then when you measure the sourdough, it pours right out without sticking to the cup!

Mix. Knead about five times. Roll or pat into 3/4 inch thickness. 
HINT: It is your choice as to rolling or patting the dough flat.  Rolling makes them more uniform - if that is important to you but patting is quicker.

This photo shows the dough after patting it flat.


This photo shows the dough after using a rolling pin.


Cut and place on ungreased baking sheet.


Bake at 425 for 8 to 10 min. Makes 12 biscuits.


You can use a knife and cut the biscuits instead of cutters if you wish.  Here I patted the dough smooth and cut the biscuits with a knife.


Set the biscuits on your baking sheet and bake.  Another biscuit hint:  If you want soft-sided biscuits, place them closer together on the baking sheet.  If you want individual biscuits, place them farther apart so they won't tough when they rise as they bake.


Here are the knife-cut biscuits.  They are not as pretty as the others but if you are short of time, here's your method.


When my boys were little, I would use different shaped cookie cutters to make my biscuits.  NOTE:  You have to watch them more closely when you're baking them because some of the different shapes and sizes burn easier.


The boys loved all the different shapes and had their favorites that they would eat first.


Here are a multitude of shapes all ready to be devoured - moons, mushrooms, bears, rabbits, whales, flowers and much more.


A mini-man, a heart and a star.


Two chickens.


We ate the biscuits with a variety of toppings - butter and honey were my favorites.  We also used jam, peanut butter, and cheese spread.

Try them and enjoy!  ;)