Showing posts with label fruit trees. Show all posts

Monday, May 27, 2013

Fruit Trees Spring 2013

Well, it has been a weird spring as far as the weather.  We had frosty cold nights (down to -5°F) a few times and a week of +30°F weather.  The last week, we had lots of rain - enough to half-fill the small wheelbarrow.

I went out to check on how the fruit is coming and found both good and bad news.

Next to no peaches.  Last year we had so many that I had to thin them out.  The late frost happened when the trees were blooming so no peaches.  :(


The apricot tree in the back is loaded - even with Barry's severe pruning this year.  He cut the tree back quite a bit to shorten it so we don't have to climb so high on the ladder to pick the fruit.


We are going to have lots of plums.  They seem to be very hardy as we have had an abundance of plums each year.


Look at the poor cherries!  :(  They are so scarce, we didn't even bag the trees against the cherry fruit fly this year.  it was too much work for so few cherries.  The frost hit the cherry blossoms as well as the peaches this year.  :(


It looks like the apple crop will be good.  I will be soon thinning out the apples so the fruit gets bigger.  I'd rather have fewer but larger fruit than lots of small apples.


The pears are plentiful and will need thinning as well.


Here is the second apricot tree which is loaded like the other tree.  It'll be the year for apricot juice and jam.


Monday, April 8, 2013

A Spring Day

The weather this spring is a lot cooler than we've had the last few years.  It goes below freezing almost every night plus has been rainy and windy.  It has been snowing up on the mountains while we are getting rain down here.

The first year we were in Lillooet, we were already planting potatoes, etc. by this date.

It was a nice day so I decided to do some work in the flower beds, with supervision, of course.   ;)

 
I was working on the quack grass and Lulu was working on the worms and bugs.

 
I would often have to move Lulu as she would get in the way - standing right where I was digging.

 
Here she is giving me a look because I had just moved her a bit.

 
Lulu does get in the way, but I really don't mind too much.  She likes to stay close to me and I think at times she gets lonely.

 
Some of the daffodils are out.

 
They are such a vibrant yellow.  I love them!

 
The apricot tree in the front yard is blooming.  There were quite a few bees buzzing around the blossoms.

 
Looks like we're getting a good crop of apricots again.

 
Apricots burst into bloom so quickly.  One day you have a bare tree and the next day you go out and BAM! - the whole tree is in bloom.  Amazing!  :) 


Thursday, September 13, 2012

Spiced Plum Chutney

I was looking into making some spicy plum chutney for a friend.  I found these three recipes that looked interesting so I took what I liked and made up a recipe of my own.

http://localfoods.about.com/od/summer/r/PlumChutney.htm
http://www.food.com/recipe/plum-chutney-40244
http://www.food.com/recipe/spiced-plum-chutney-193167

I decided to use both my Italian plums and prune plums.

Italian plums are larger and have a more yellow coloured flesh than the prune plums.


Prune plums can be eaten quite green (my dad likes them this way) or you can wait until they are softer and the flesh is a little yellower.  They are usually the last plums ready but this year, one of the trees was ripe early so I used them in the chutney.


Ingredients

10 c plums - cut into pieces (I used prune plums and Italian plums)
4 apples - cored, peeled and chopped - (about 2 c)
1 onion, chopped
2 large cloves garlic, minced
1 c golden raisins
2 c sugar
1 1/2 c vinegar
2 tsp salt
2 Tbsp mustard seed
1 tsp curry powder
1 tsp ground ginger
1 tsp cinnamon
1/2 tsp ground cloves
1/2 tsp cayenne pepper
1/2 tsp red pepper flakes


Wash and pit plums.

 
Cut into pieces.  I ended up using 5 cups of Italian Plums.
 
 
Do the same with the prune plums. 

 
I again used 5 cups of cut-up prune plums. 

 
Peel, core and chop apples.  Chop onion and mince garlic.  Add raisins and rest of ingredients.  Bring to a boil, then reduce heat.  Stir often and let mixture cook and thicken.  It takes around an hour for this to happen.

 
Fill sterilized jars and process in a hot water bath for 10 minutes.  This recipe made 5 pints and 1 half pint.  You should allow chutney to sit for 4 to 6 weeks before eating it so the flavours can meld. 


Thursday, August 30, 2012

Peach and Yellow Plum Chutney

We have an over-abundance of peaches this year.  We have 5 1/2 peach trees (one tree is almost dead) and we have peaches coming out the ying-yang.  The first year we were here, we got a grand total of 7 peaches.  Yes 7 peaches from 6 trees!  It got cool that spring when the peach trees were blooming and the flowers didn't set.

This spring we had lots of fruit so I started thinning the peach and apple trees.  You are to thin so the fruit doesn't touch when it is full grown.  I thinned out a lot of fruit but didn't get all the trees finished.  The tree below got missed.  There were tons of fruit and they were quite a bit smaller than on the trees I thinned.


 This tree was thinned - you can see most fruit are not touching each other.


 This is a later tree because although the peaches are quite red, they still are very hard.


We also have 2 yellow plum trees and the plums are just clumped together.  I was told that you don't have to thin plums as they self-thin and drop excess fruit.  WRONG!  Look at these plums.


Anyway, back to the chutney.  A friend asked me to make some chutney for her and upon doing some research, I found so many interesting recipes to choose from.  I got this one from my cookbook 250 Home Preserving Favorites by Yvonne Tremblay.  It looked tasty plus it used peaches and yellow plums.
 
 
Ingredients
 
4 c plums - chopped
3 c peaches - peeled and chopped
2 1/2 c sugar (the recipe asked for brown sugar but I read that the chutney would be a darker colour with it.  I decided to go with white sugar to help keep the lovely colours of the fruit)
1 c  diced yellow or red pepper (I used red for a contrasting colour)
1 c chopped onion
1 large clove garlic, minced
1 green or red hot chili pepper, minced or 1 tsp hot pepper flakes (I used red pepper flakes)
2/3 c vinegar
2 Tbsp grated ginger root
1 Tbsp grated lemon rind
2 tsp salt
1 tsp cinnamon
1 tsp ground cloves
1 tsp mustard seed
1/2 tsp ground coriander
1/2 tsp turmeric
 
 
 Peel and chop peaches. 


Chop and pit plums.  Leave the peel on as it breaks down in cooking.  It also adds pectin to aid with the thickening of the chutney.

 
Mince garlic, chop onion and dice pepper.  Add to fruit in a large heavy-bottomed pot. 

 
 Grate lemon ring and ginger root.  Add to rest.

 
Add sugar, spices and vinegar to rest of ingredients.  Isn't it a lovely colour?  Stir often while bringing to a boil.  Reduce heat to a gentle boil.  Stir often while mixture cooks and thickens.  (about 45 - 60 minutes)  Ladle into sterilized jars and process for 10 minutes in a hot water bath.


The recipe is for 5 half-pints but I got 3 pints and 2 half-pints. (I used a bit more fruit and didn't measure the pepper or onion)  You are to store for at least a month so the flavours can meld.  It turned out to be a lovely colour and had a yummy aroma while cooking.  Enjoy!  ;) 


Thursday, August 2, 2012

Apricot Juice and Spiced Apricot Jam

Well the apricots are ready.  We have two apricot trees that are quite different.   I was told that the apricot trees here in Lillooet all got their start from apricot pits brought over by the Chinese labourers that worked on the railroad years ago.  Apricot trees start very easily. 

Our tree in the back has very juicy fruit - so juicy that as the fruit ripens they they start to hang like little sacks of juice.  You don't want to brush against those when you are picking apricots or you'll be covered in sticky juice.  These apricots are great to eat right off the tree or to make into juice.  The fruit on the tree in the front never get that soft.  They are not as sweet to eat right from the tree but they freeze well and are good in desserts and jam.

This year, many of the apricots from the back tree had splits in the skin so were not usable as the ants were drawn to the sweetness.  We think it may have been the weather with the rainy cool spring and then very hot temperatures.  We think the skins might have toughened up and then split as the fruit got larger - but this is just speculation on our parts.


This is how I make juice and jam.  I picked two large buckets of fruit.  I wash, sorted and pitted the apricots.


I then ran the apricots through my juicer.  I have a Breville Juice Fountain Elite.  The juice goes into the jug on the right side and the pulp is collected in the container on the left.


I then bring the juice to a boil.  Skim off any foam so the juice is clearer.


Pour the juice into sterilized jars and process in a hot water bath for 10 minutes.  I got 4 quarts of apricot nectar.  I don't strain out the pulp so the juice is very thick and oh so tasty.


Then I used the leftover pulp for Spiced Apricot Jam.  You could use regular apricots for the jam but would just have to cook it longer.

Ingredients
8 c apricot pulp
4 c sugar
1/3 c lemon juice
1 qt homemade pectin
1 1/2 tsp cinnamon
1/2 tsp allspice
1/2 tsp cloves


Pour the pulp and the rest of the ingredients in a large pot and bring to a boil, stirring frequently so the jam won't burn.  The smell of apricots and spices is wonderful as the jam cooks.


I bought a candy thermometer this year and am using it instead of the cold saucer to test the jam.  You are to cook the jam until it reaches 220°F or 100°C.  Since the pulp was so thick it had a tendency to spatter and spit so I had to put it into a taller pot. 


When it reaches the jam stage, pour into sterilized jars and process in a hot water bath for 10 minutes.  I got 6 pints of jam. 


Monday, April 9, 2012

Pruning Tips

Last year I showed some photos relating to pruning fruit trees.  http://mountaingardengleanings.blogspot.ca/2011/04/pruning-fruit-trees.html  This year, I decided to give a few more tips and techniques.  We are not pruning experts by any means, but Barry watched and learned from a master.  He is able to see what happens when you do or don't follow what was taught.

We do our pruning during the winter.  Some people prune in spring but we find there are enough other jobs to do then, so it is easier to get out there on nice days during the winter season and "get 'er done".  In some locations, (like Saskatchewan, for example) winter pruning would be cold and uncomfortable and you may want to wait until better weather.

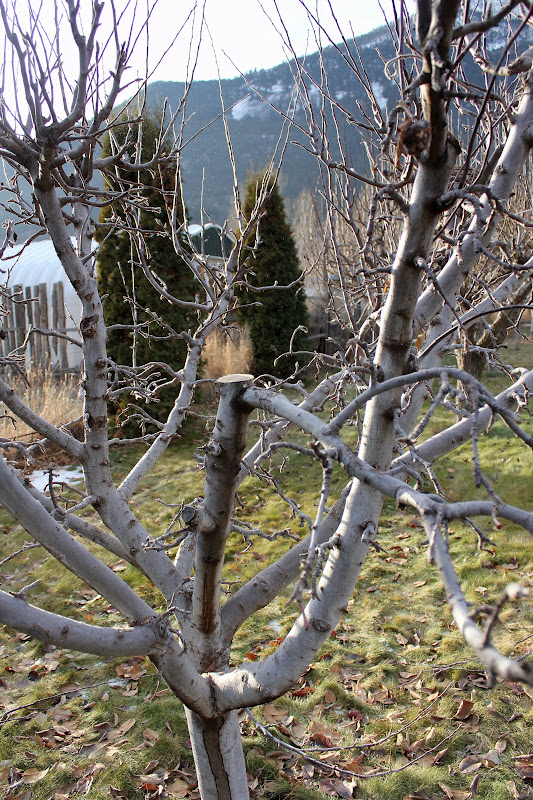
This photo shows thinning.  You can see the centre branch was cut off.  If it had been left, the three branches would rub and side branches would cross.  You don't want this as the fruit needs open areas to grow.  We had some fruit trying to grow between branches and it gets misshapen and also is an easier target for pests to attack.


On this branch you can see all the new growth.  Mario called these "knuckles"  and especially on apple trees, this is where the fruit grows from.  If you cut off all the growth with knuckles, you won't have apples.


Here Barry is doing directional pruning.  When you cut off a branch, you want to cut it above a bud that is on side that you want the branch to grow towards.


This shows the branch with the bud on the left under the cut.  This is where the new branch will grow.  You usually want your branches to grow out instead of crowding the centre of the tree.


Here he is removing the end of this branch.  If you leave some of the branches too long, the fruit will weigh them down and they will hang too low or even break.  You want to be able to pick fruit comfortably but you don't want the branches in the way for mowing and walking.  You have to decide what is best for the space you have and the shape and size of your trees.


This tree has many crooked and crossed branches so each year more are pruned out.  Pruning is a progression.  You cut some branches off, then wait for new ones to grow so you can prune and shape them the way you want them to grow.


When cutting off larger branches, you want to cut them close to the trunk of the tree.  If you don't, you get numerous shoots growing from the area in big lumpy messes.


Here is a tree before pruning.  You can see all the long straight branches growing straight up.  These are all new growth from last year that need to be controlled to keep the fruit growing low enough to pick without a tall ladder.


Here you can see a tree that needs pruning in the centre.  If the leaves are too thick in the centre, the fruit is shaded too much and has trouble ripening.  There is a happy medium to having an airy centre to your tree and not going too far and cutting out all the centre of the tree.  Some of our trees had the centres cut completely out and it is very difficult to coax the growth back. 


Sometimes when you have too many gnarls and crossed branches, it is best to cut off the whole branch.  This is the before pic.


During the process, using a pruning saw.


After the branch is gone.  You can see the space in the centre but can also see the side branches from the other branches will fill that area and not be so crowded.


Here is another example of the tree before major pruning.


Here is the same tree after.  Again everything has more room to grow.


Here are the pruning tools we use most of the time.  We have another saw/cutter that is used for taller trees.  We used it when we lived in Calgary but don't use it much here.


Trees are very forgiving and will keep growing despite a bad pruning.  They may not look their best or produce the best crop but will continue to grow.  We are trying to prune for production and to keep the trees low enough to be able to harvest without climbing a ladder.  This is possible for most of the trees but some were too tall when we bought the place to be able to prune them enough to harvest fruit from the ground.  We keep learning more about pruning each year.