Showing posts with label herbs. Show all posts

Monday, October 8, 2012

Parsley Seeds

Did you know parsley is a biennial?  That means it produces seeds the second year before dying off.  Here is my parsley earlier this year.  This is the first year I've had it regrow the second year.  When I lived in Saskatchewan, it was too cold for the plant to survive the winter.  Last year, I covered my herb beds with leaves and it seemed to protect the plants.

 
The plant did not take long to start sending out flowers. 

 
It looked quite pretty and lacy as the flowers were greenish-white. 

 
The bees and other insects really liked the parsley flowers and were always swarming around it. 

 
As the flowers turned into seed heads, I decided it was time to harvest before I had a huge parsley field covering my herb garden and walkway.

 
I cut off bunches of seeds and laid them on the lawn so I could tie them together to hang up to dry.  Of course, Lulu had to come over and check out what I was doing.  Parsley is not a favorite of hers.  In fact, none of the chickens were very interested in it.

 
After the bunches were tied up, I hung them up to dry.  Lulu stuck around hoping for something more edible.

 
Here the plants have dried sufficiently to harvest the seeds. 

 
After the seeds were removed from the stems, I laid them out to dry some more.  I always try to make sure the seeds are totally dry so they don't spoil during storage.

 
Now I'll have seed for the next few years plus some to give away.  ;) 


Monday, June 18, 2012

Focaccia Bread

I decided to try my hand at Focaccia Bread.  I found three recipes that I combined to make my own. http://annastable.blogspot.ca/2011/01/no-knead-tomato-focaccia.html   &
http://simplyrecipes.com/recipes/focaccia_bread_with_rosemary/   &  http://allrecipes.com/recipe/focaccia-bread/


Ingredients
1/2 c warm water
1 tsp sugar
1 tbsp yeast

1 1/2 c water
1 tsp salt
2 tbsp olive oil
4+ c flour
1 tsp oregano
1 tsp basil
1 tsp thyme
1/2 tsp garlic powder
pinch pepper

1 c mozzarella cheese, grated
1/2 c parmesan cheese, grated
2 cloves garlic, minced
sundried tomatoes
olive oil


I had never used sundried tomatoes in my cooking.  So last year I decided to dehydrate some Roma tomatoes.  After they were dried, I froze them.


For this recipe, I decided to try two methods of using the tomatoes.  The first was to rehydrate in water.


The second was to rehydrate in olive oil.


I also minced some garlic for the recipe as well.


To make the dough:  Stir the sugar into the warm water and add yeast.  Set aside for about 10 minutes so yeast can start to work.  Mix the spices into a couple cups flour.  Mix the water, oil, salt and yeast and add spiced flour.  Different spices can be used - some use rosemary, etc. but I am partial to oregano.  Add rest of flour, mixing until you have a soft dough.  Knead until smooth and elastic.  Grease bowl with olive oil and roll dough around until coated.  Cover and let rise until double.


Grate mozzarella cheese and set aside.


Divide dough in half and press each onto a well oiled cookie sheet.  Press out dough until it fills the sheet.  Set aside to rise for about 30 minutes.


Use your thumb or finger to press indentations into the dough in rows.


Drizzle on some olive oil making sure it fills many of the indentations.


For one pan, I sprinkled mozzarella and parmesan cheeses.


For the second, I sprinkled on the minced garlic.


Then I added the two types of tomatoes to see which were better.  On the left are the oil ones and on the right the ones soaked in water.  Then sprinkle with the two cheeses.


Bake at 425°F for about 15 minutes or until nicely browned.  This was the cheese focaccia.


This was the garlic sundried tomato one.  Again the oil tomatoes are on the left and the water rehydrated ones on the right.


Remove them from the pan.  Cut into squares and enjoy.


The cheesy focaccia was very tasty with the herbs and cheese combination.  It was good the second, even cold.  The tomato one would have been a great addition to a spaghetti dinner.  The water dehydrated tomatoes turned out to be similar in taste to using fresh tomatoes.  The ones I soaked in oil tasted better but burned more easily because they weren't so moist.  So I have a dilemma next time I try it in how to do the tomatoes. 


Thursday, October 13, 2011

Savings Seeds

I have started trying to save some of my own seeds.  I attended a seed saving workshop at our Seedy Saturday this year and learned a lot. 

Last year I saved some lettuce seeds because I got some Deer-Tongue Lettuce at Seedy Saturday that year.  I had never seen that kind of lettuce before and liked that it seemed to stay edible longer than my other lettuce which seemed to go bitter quite quickly.  It was quite easy to save - you let the plant flower and when the flowers turn to fluff, I pulled it out and hung it to dry some more.  I then shook and hit the plant in a large bag and collected the seeds that way.

I hang the plants in the greenhouse to dry just as I do with my herbs.  Here are some of my mixed greens drying.  I had several packs of mixed lettuce and mesclun mix and tried to save some of the different plants.  I was not successful saving seed from most of the lettuces but was with the mustardy greens.  They are a great addition to salads as they have a tang and really add some flavor and variety.


Here are the pods from the dried greens.


I crushed the pods to extract the seeds.  You can see the different colours of the different varieties.  I just labelled them as mixed greens.


I would gently blow away the chaff for storage.  I also have a small strainer that I use, but unfortunately not only the seeds go through the holes.  So my seeds are not as clean as store bought seeds - there are bits of fine plant matter that was hard to remove. 


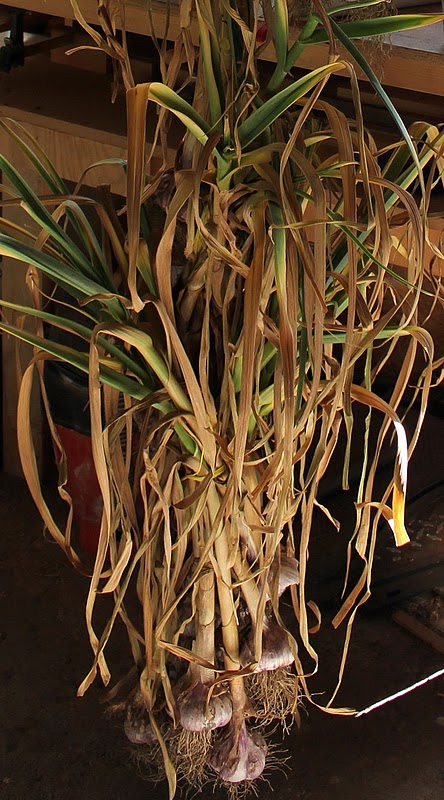
Here is my garlic drying.  I hung it in the garage instead of the greenhouse because the greenhouse is attached to the house and the scent of the garlic drifted into the bedrooms when the windows were open.  It is not that I hate the smell of garlic but when I was trying to sleep my stomach would be thinking about spaghetti sauce.


I will be saving the largest heads to replant this October.  When the leaves dry up I cut the heads off and store them until later.


For the last couple of years I have also got different beans from Seedy Saturday and dried them for cooking and also replanting the following year.  I leave the plants in the garden until the pods turned brown and dry.  I then pull out all the plants and pick off the pods.  After that I sit under the grape arbor, shell beans and watch the chickens whenever I need a break or to do something out of the sun.


I had at least four different varieties that I tried.  The Pinto Beans and the Black Beans were from last year and I saved my own seed.  This year I also planted some Kidney Beans and White Soup Beans.  After all the beans were shelled, I laid them on trays in the greenhouse to make sure they were good and dry.  Then they get sorted and stored until used later.


I also brought in the sunflowers to dry because the birds were eating them and I wanted them for my chickens.


After the heads are dry, I shell the seeds into a pail.  I wasn't too worried about all the leaves, etc because they are for the chickens and they are not going to mind.


I also saved some dill this year.  I didn't have much luck with it in my herb garden because a couple of chickens got out in the spring and scratched up some of the herb boxes.  I had some growing in another part of the garden but want it back in its own herb box next year.


I have some very pretty double poppies that I saved the seeds from.  Several were volunteers in the garden so I saved some seed and snipped off the rest of the seed pods so I wouldn't have any there next year.  I know I should have pulled it out but it was too pretty.  Here you can see how tiny the poppy seeds are compared to the dill seed.


I also have some marigold seeds.  Some years I have planted them at the ends of rows in the garden.. It is supposed to keep away some pests - I don't know if it does but they don't hurt anything being there and are nice and bright with their orange and yellow faces.


I haven't tried saving tomatoes, cukes, etc yet but there is always next year.  ;)


Monday, August 8, 2011

Drying Herbs

Last year I dried most of my herbs in my dehydrator but found some of them did not work as well.  Sage takes much too long to dry so I dried it by our wood stove instead.

This year I decided to try drying some of the herbs by hanging them in bunches in the greenhouse.  You are supposed to cut your herbs in the morning before the sun dries out their scented oils.


Last year I dried lots of chocolate mint for tea.  Everyone who tried it loved it.  This year my chocolate mint is not growing very tall so I won't have as much to dry.


I decided to try drying my spearmint and peppermint to see if I like the tea from them.  I have heard from some people that they don't make very nice tea.  I dried a small bunch of each and tried the tea when my sister-in-law was visiting.  Neither of us liked the tea.  I put it down to the weather as this year has been wetter than usual and not as warm. 
Since then I was reading a thread in The Easy Garden http://www.theeasygarden.com/forum/viewtopic.php?pid=290791#p290791 about someone else whose mint wasn't very minty.  They were told that if they started the plants from seed they may not come true to the original.  It is best to start mint from a slip from a plant you like instead of seeds.  I may get rid of those mints and expand my chocolate mint.


I also decided to dry some oregano by hanging since it has long stems and small leaves.  I read you are supposed to harvest herbs before they bloom for the best results but I was late with the oregano.  I cut off the flowers and hung it to dry.


Once the bunches were dry, I brought them in to remove the leaves from the stems.


Here you can see a close-up of the dried oregano plants.


The leaves were placed in a bowl and then were crushed into smaller pieces.  The oregano did not smell as strong as they have previously but that could be because they were blooming.


I also cut some sage to dry.  Last year I had tried to dry it in a dehydrator but the leaves are too thick and took too long.


I used young branches as I had previously trimmed back the old woody branches after they bloomed.


I tied the sage in small bunches to hang in the green house.


I also picked stems of lavender to dry.


The little bunches of lavender are so pretty and nicely scented.


I hang the herbs from cup hooks I screwed into the cross beams.  I space the bunches out so they are well ventilated and have room to dry.