Monday, October 17, 2011

Faux Pineapple or Zucchini Pineapple

Two years ago I found this recipe and made some Faux Pineapple.  I got the recipe from the following link. http://www.food.com/recipe/zucchini-pineapple-faux-pineapple-u-s-d-a-376373

I shredded the zucchini but found it wasn't close enough to crushed pineapple for my liking.  This year I tried it again with several changes and I am much happier with it.
Ingredients
16+ c packed zucchini  (either chopped or cut into 1/2-inch cubes)
1 liter unsweetened pineapple juice
1 1/2 c lemon juice

3 c sugar


I had a large zucchini that I used for this recipe.  First peel and remove the seeds and innards.  This zucchini was very hard skinned and I needed to use a knife instead of a peeler.


Now I wanted crushed pineapple so I decided to try the food processor.  If you want pineapple tidbits, cut the zucchini into small cubes.


I then cut the zucchini into pieces to fit into the food processor.


I am holding several of the chunks so you get an idea of the size I used.


I processed the zucchini until it was chopped fairly fine.  This zucchini was not too juicy so it didn't turn to mush.  If you have a softer zucchini try pulse so you don't over process it.


Measure about 16 cups and add to your heavy canning pot.


Add one liter of pineapple juice.  The original recipe asked for 46 oz but I found it a little too runny.  So I decided to only add a liter (which is about 33 oz).


Add lemon juice.


Add sugar and stir together.


Bring to a boil and then reduce heat and simmer for 20 minutes.  Stir to keep from sticking to the pot and burning.


Fill sterilized jars leaving 1/2" to 1" head space.  Wipe jars and tighten tops.  Process in hot water bath for 15 minutes.  Makes around 11 pints.  I probably had closer to 18 cups of zucchini so you probably would get 9 or 10 pints.


Some recipes call for yellow food colouring but I never use the stuff.  I think it looks close enough to crushed pineapple without the food colouring anyway.  Enjoy!  ;)


Follow up: I would have liked it to have a bit more juice so would add a bit more next time.  The last time I made it, it might have been runny because I didn't add extra zucchini and it was probably a softer one so it turned juicier. 


Thursday, October 13, 2011

Savings Seeds

I have started trying to save some of my own seeds.  I attended a seed saving workshop at our Seedy Saturday this year and learned a lot. 

Last year I saved some lettuce seeds because I got some Deer-Tongue Lettuce at Seedy Saturday that year.  I had never seen that kind of lettuce before and liked that it seemed to stay edible longer than my other lettuce which seemed to go bitter quite quickly.  It was quite easy to save - you let the plant flower and when the flowers turn to fluff, I pulled it out and hung it to dry some more.  I then shook and hit the plant in a large bag and collected the seeds that way.

I hang the plants in the greenhouse to dry just as I do with my herbs.  Here are some of my mixed greens drying.  I had several packs of mixed lettuce and mesclun mix and tried to save some of the different plants.  I was not successful saving seed from most of the lettuces but was with the mustardy greens.  They are a great addition to salads as they have a tang and really add some flavor and variety.


Here are the pods from the dried greens.


I crushed the pods to extract the seeds.  You can see the different colours of the different varieties.  I just labelled them as mixed greens.


I would gently blow away the chaff for storage.  I also have a small strainer that I use, but unfortunately not only the seeds go through the holes.  So my seeds are not as clean as store bought seeds - there are bits of fine plant matter that was hard to remove. 


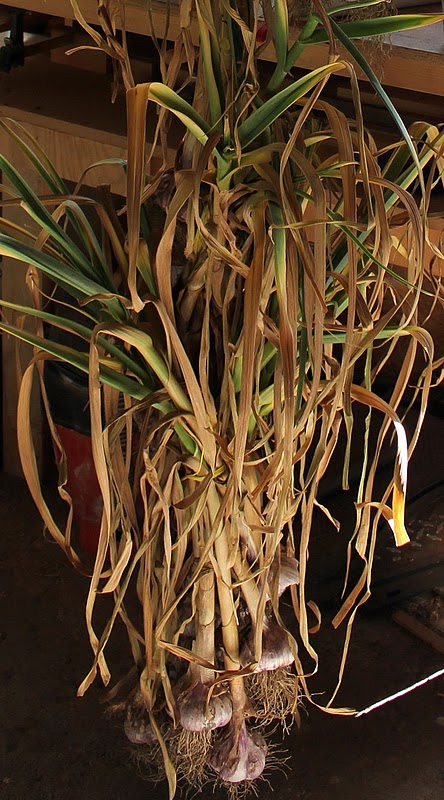
Here is my garlic drying.  I hung it in the garage instead of the greenhouse because the greenhouse is attached to the house and the scent of the garlic drifted into the bedrooms when the windows were open.  It is not that I hate the smell of garlic but when I was trying to sleep my stomach would be thinking about spaghetti sauce.


I will be saving the largest heads to replant this October.  When the leaves dry up I cut the heads off and store them until later.


For the last couple of years I have also got different beans from Seedy Saturday and dried them for cooking and also replanting the following year.  I leave the plants in the garden until the pods turned brown and dry.  I then pull out all the plants and pick off the pods.  After that I sit under the grape arbor, shell beans and watch the chickens whenever I need a break or to do something out of the sun.


I had at least four different varieties that I tried.  The Pinto Beans and the Black Beans were from last year and I saved my own seed.  This year I also planted some Kidney Beans and White Soup Beans.  After all the beans were shelled, I laid them on trays in the greenhouse to make sure they were good and dry.  Then they get sorted and stored until used later.


I also brought in the sunflowers to dry because the birds were eating them and I wanted them for my chickens.


After the heads are dry, I shell the seeds into a pail.  I wasn't too worried about all the leaves, etc because they are for the chickens and they are not going to mind.


I also saved some dill this year.  I didn't have much luck with it in my herb garden because a couple of chickens got out in the spring and scratched up some of the herb boxes.  I had some growing in another part of the garden but want it back in its own herb box next year.


I have some very pretty double poppies that I saved the seeds from.  Several were volunteers in the garden so I saved some seed and snipped off the rest of the seed pods so I wouldn't have any there next year.  I know I should have pulled it out but it was too pretty.  Here you can see how tiny the poppy seeds are compared to the dill seed.


I also have some marigold seeds.  Some years I have planted them at the ends of rows in the garden.. It is supposed to keep away some pests - I don't know if it does but they don't hurt anything being there and are nice and bright with their orange and yellow faces.


I haven't tried saving tomatoes, cukes, etc yet but there is always next year.  ;)


Monday, October 10, 2011

Thanksgiving Laughs and Carrot Tales

Today is Thanksgiving Day in Canada.  We celebrate with turkey, stuffing, pumpkin pie and family get-togethers.  We hope the nice weather lasts for the last long weekend of the season.  Crisp leaves, no school, football games and more.

I love the follow clip and think about it every time I stuff a turkey.  (Even if it is Christmas clip, it gives me a laugh every Thanksgiving)

Good old Mr. Bean!  Thanks for the laughs!


Happy Thanksgiving everyone! 

PS   Here's a story for you.  My mom and dad came to visit earlier this year for a couple of weeks. My dad is 80 going on 25 (he can work a 25 year old under the table any day!)  He loved being out in the yard tilling and chipping food for the chickens among other things.  He was having fun tilling between the rows in the garden and in the chicken yard (especially the chicken yard!).


Here's my dad tilling for the chickens.


He liked to till in circles and watch them follow him.


Here are the girls eating in a circle.


My dad hasn't tilled for many years and it took a bit to get used to our tiller (it was more powerful than the smaller one he used to own).  Anyway, during his tilling fun, he tilled up most of my carrots as they were still fairly small.  Since he was having so much fun, I didn't say anything and waited until they were gone to plant more carrots.  Some of my original carrots survived the tilling and those were what I was using.  Yesterday I went out to dig up some of the carrots I had planted after he left.  I hadn't used them at all and they were basically forgotten all summer.  Well, they were huge!  Here are a few of the giants!


Thursday, October 6, 2011

Apple Jelly

A friend sent me this poem and it is very fitting for the season.  No truer words are spoken.  Enjoy!

Apple Jelly

No sense in all this picking,


peeling and simmering


if sheer food is all


you want; you can buy it cheaper.


Why then do we burn our hours

and muscles in this stove,

cut our thumbs, to get these tiny

glass pots of clear jelly?


Hoarded in winter: the sun

on that noon, your awkward leap
down from the tree,

licked fingers, sweet pink juice,

what we keep
the taste of the act,

taste of this day.


by Margaret Atwood


Monday, October 3, 2011

My Chickens are All Gone!

I went out yesterday morning to feed the girls and all I found was dead bodies and feathers all over the chicken run.  I had 25 girls and all but 5 were gone.  Something killed them all just for sport. 

I have a four foot fence all around the chicken run and nothing had dug under it.  All the gates were all shut to the run and to the whole yard.  Something had to jump over several fences to get them. 

I am just numb.  I can't believe some animal would do that much carnage.

There were some large footprints in the run so I took some pics.  Any guesses to what it was?  My neighbour thinks it was a cougar or bobcat.


I caught the survivors and gave them to a neighbour who has her chickens in a covered run and dogs in her yard so they will be safe.  They were so scared - poor things.

All I have left is Lulu and she isn't happy with me because I won't let her out of my sight and won't let her stay out in the yard by herself. 

It is so quiet and lonely in the yard.  :(

Thursday, September 29, 2011

Uses for Wood Shavings

We get wood shavings from a sawmill near town.  There are several mills around here and they all give away their wood shavings.  It saves them having to pay to haul them away.  We have found one place that has the perfect shavings for us.  At some of the other places, they are too fine and contain too much sawdust so they are hard to use.  All you need is a shovel and garbage bags and you are in business.

We mostly use the shavings for the chicken coop.  I use the deep-litter method to cover the floor and find it works great with little or no smell and little work on a daily and weekly basis. 

How the deep-litter method works is that you cover the floor with shavings and as the girls poo (usually from high on the roosts at night) you add more shavings and it all gets mixed together.  The shavings keep the floors dry and relatively odor free.  Some people rake out the droppings but I don't.  Some people stir them into the shavings but I don't.  What I do is occasionally throw in a handful of scratch (grain) and the girls stir it up with their digging and scratching.  When the shavings are too dirty, usually they are 6 to 8" deep they get hauled out to use in the garden and we start again.  They get spread on the half of the garden we are not using that year and dug in so they break down and provide nutrients for the next season.

I also read that you can use the shavings as ground cover so I decided to try that in the raspberry patch.  First we weeded between the rows.


Then it was rototilled and raked smooth.


Next we overlapped newspapers.  We layered them around half a dozen pages thick or so.  This is supposed to help keep the weeds down.


After the newspaper was down, we dumped on the shavings and spread them around.


The shavings are around three inches thick between the rows.


Now doesn't that look nice?  I think it will work great so we won't have to till between the rows.  If the shavings get too packed, we can just add more.  All it takes is a trip to the mill and we're in business again.


If it works well then we will use paper and shavings as ground cover between all the permanent rows at the back.  Only time will tell.  ;)