Showing posts with label main course. Show all posts

Thursday, June 20, 2013

Sourdough Sharing - Crepes

This month's sourdough challenge was crepes.  The recipe was so easy-peasy and tasty.  My challenge came when it was time to make the crepes as I don't own a correct size frying pan.

Ingredients
1 c sourdough
2 eggs
2 Tbsp melted butter
1/4 tsp salt
1/4 to 1/2 c milk

Beat all ingredients together, adding enough milk to have a thin batter.  Heat the frying pan, add some butter and pour in 1/4 c of batter. 


Now comes the tricky part.  You are to use a pan between 8" and 10" in diameter.  I only have cast irons frying pans - one 6" and the other 12".  I used the 12" because the 6" was too small but found it too heavy to swirl the pan around so I ended up with flower shapes instead of nice round, thin crepes.


You are to cook the crepe for a minute or two, then flip and cook about 30 seconds or so on the other side.  Remove crepe to plate and continue making until finished the batter.  This makes about 8 to 10 crepes.


I then tried to pour the batter round but ended up with a thick crepe (or thin pancake).


I found this recipe and thought I sounded yummy and easy.  Spread Nutella on crepe and add a banana.  I cut the banana lengthwise so each crepe was rolled around 1/2 banana.


I also spread some with peanut butter and rolled them around the banana as well.  Both were very tasty and would be enjoyed by kids and adults alike.


I found the crepe very tasty and made them a second time as pancakes without trying to swirl my heavy pan.  They were very tasty with butter and syrup. 
 
I will try the crepes again when I have the right size pan.  They were tasty and easy to whip up with so few ingredients.
 
You can make your crepes into sweet dessert crepes or savory crepes as a main course depending on your filling.
 
Check out the links below for more delicious crepe ideas.  Enjoy!  ;)


Saturday, April 20, 2013

Sourdough Sharing - Pasta

This month's sourdough challenge was pasta.  I had made homemade pasta before so that was not a surprise.  The surprise was how lovely the dough turned out using sourdough.

I used this recipe and found it easy to work with.

Ingredients (I doubled the original recipe)
1 c sourdough
3 c flour
4 eggs

I used my Cuisinart with the bread hook to mix and knead the dough.  Pour sourdough into mixing bowl.  Mix in eggs and then flour.  I then set the timer to knead for 5 minutes.  I found the dough a bit sticky so I added a bit more flour.  The dough turned out lovely and soft.  I placed the dough in a greased bowl and let rest for several hours.


You can use a rolling pin to roll out the pasta but I have a pasta machine so used it.  Cut off a piece of the dough and flatten on a floured surface.  You need to keep the surface of the dough floured or it will stick. 
 

Roll the dough through the machine at the widest thickness (#7 on mine).  (Thanks to Barry for helping out so I could get pics!)
 

Flour both sides and keep putting it through the machine getting thinner each time.  (I stopped at #3 thickness)


I found the sourdough dough very easy to work with.  The other dough I made had a tendency to stick - it was hard to get enough flour on it.  With that dough, you needed a second person to help because you didn't have enough hands to roll the dough, turn the crank and hold the dough coming out so it wouldn't stick.  This dough just ran though the machine so easily that you can easily do it by yourself.
 
Now cut the dough into manageable lengths. 
 
 
I then ran it through the machine on the fettuccine cutter.  Mine only has two widths - fettuccine and spaghetti. 

 
Separate the noodles and place on pasta dryer, rack or flat surface to dry for storage, if you wish.


I dry the noodles and then break them in half and store them in a flat container.


Or you can boil up a batch and eat them immediately!  


I made mine into Fettuccine Alfredo using this sauce.  Homemade sauce and homemade sourdough pasta - YUM! YUM! YUM! What more can a person ask for?  ;)
 
Since the dough was so easy to work with - this will now be my regular pasta recipe.  Easy and tasty!  Enjoy!   ;)


Check out some of the other recipes below for April's Sourdough Surprises Challenge.


Thursday, April 18, 2013

Alfredo Sauce

This month's Sourdough Surprise is pasta so I decided to make a homemade Alfredo Sauce to go with my Fettuccine noodles.  I checked out this three different links - one, two, three and combined the recipes to make my own sauce.

Ingredients
1/2 c butter
1 - 2 cloves garlic, minced
1 pkg cream cheese
1 c 1/2 & 1/2 cream
1 c milk
1/4 c shredded parmesan cheese
salt & pepper to taste

 
Melt butter in saucepan over medium to medium-low heat.  Add garlic and cook for a few minutes before adding cream cheese.  Mixture looks curled as cream cheese melts.


Whisk mixture until smooth.  Slowly add milk and cream while whisking to keep it smooth. 


Mix in parmesan cheese.  Add salt and pepper to taste.  If the sauce thickens too much, add a bit of milk.


Cook fettuccine noodles.  Drain well and pour into bowl.


Mix in Alfredo Sauce.


Sprinkle on some parsley.  Enjoy!


This was so heavenly.  Rich and tasty.  We only used half the sauce, so will be making another meal with some add-ins.  Some ideas - grilled chicken breasts, spinach, fried mushrooms and onions, broccoli, grilled salmon . . .   The list goes on and on.


Monday, November 19, 2012

Lazy Man Cabbage Rolls

 
Since I blanched and froze quite a bit chopped cabbage (I had trouble with the heads splitting this summer), I decided to make some Lazy Man Cabbage Rolls.  You can make this recipe in your crockpot but I left mine in the trailer with Barry so I made them in the oven.  I had never used frozen cabbage for this and was interested to see how they would turn out. 
 
I brought the cabbage out several days early and thawed it in a container in the fridge.  You need to drain the cabbage before you can use it.
 
 
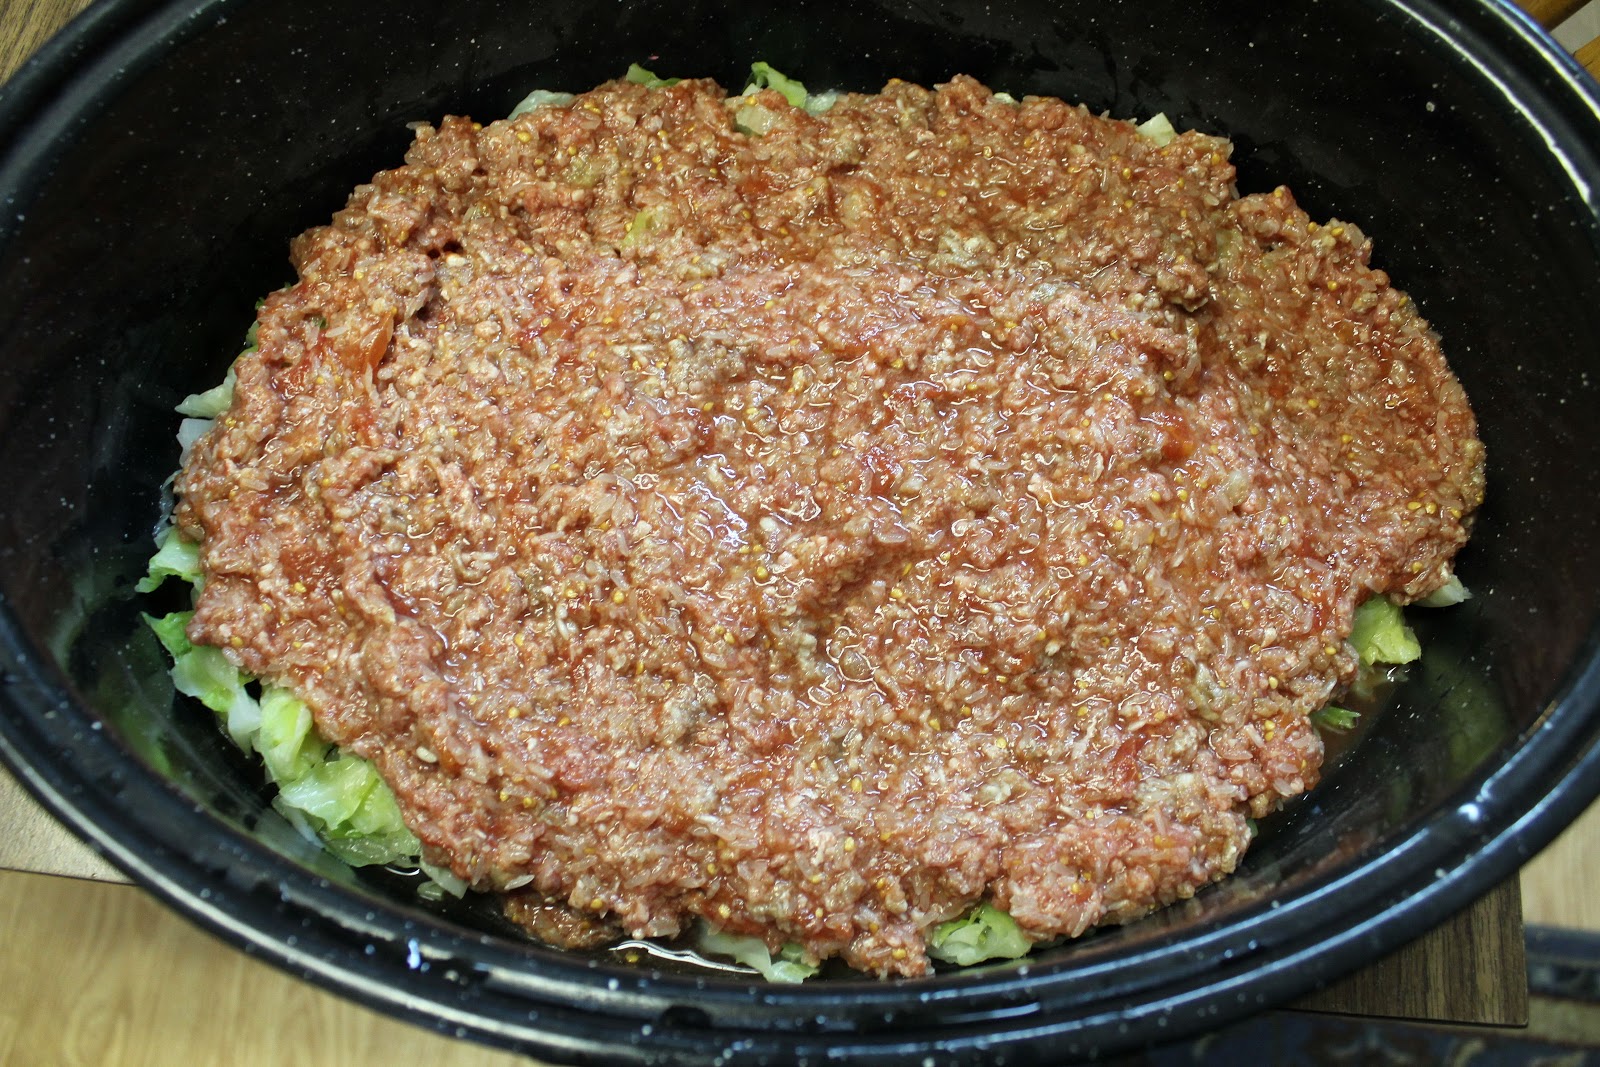
I mix together about 1 - 1 1/2 pounds of hamburger and 1 - 1 1/2 cups rice.  I add salt and pepper to this.  You could also add chopped onion if you wish. 

 
I then mix in a quart sealer of canned tomatoes.  I break the tomatoes up so the chunks are small. 

 
Put half the cabbage in the bottom of a roaster or casserole dish.  I almost always use a roaster so I have less chance of my casseroles boiling over. 

 
Place hamburger - rice mixture onto cabbage. 

 
Sprinkle on the rest of the cabbage. 

 
Mix a can of tomato soup with 3/4 can of water and pour it on top

 
Cook at 350°F for about 1 hour.  You can eat it as is or you can serve it with some sour cream.   


 I was very pleased with the taste and texture of the cabbage.  I would be hard pressed to tell the difference in taste between fresh and frozen. 


Monday, June 4, 2012

Crispy Grilled Cheese Sandwiches

I saw this recipe and thought it sounded wonderful. 
http://www.seriouseats.com/recipes/2012/01/crisp-grilled-cheese-sandwich-recipe.html
I love melted cheese but I also love crispy cheese that you get when you order cheese toast in a restaurant and they have grilled it so it is nice and crispy.  This recipe has both!


Ingredients
4 slices bread
soft butter or marg

1/2 c grated parmesan cheese
1 c grated cheese - cheddar or cheddar-mozzarella mix

I grated both cheddar and mozzarella cheese because I like the extra gooeyness of mozzarella but wanted the taste of the cheddar.


Finely grate parmesan or use pre-grated (I didn't have any fresh so used the handy can).


Slice bread fairly thick and butter both sides of each slice.


Place 2 slices in preheated pan and cook until browned.


Sprinkle both slices with parmesan cheese.


Flip the slices over to brown the second side.


Sprinkle cheddar or cheddar-mozza on top of the 2 slices.


Cook until cheese starts to melt and bottom is nicely brown.


Quickly flip one piece onto the second and remove from pan.  Repeat with other 2 slices or as many sandwiches as you need.


Let sandwich sit a couple of minutes so the inside is melted and nice and gooey.  Slice in half and enjoy!  ;)


Thursday, May 24, 2012

Cabbage Rolls

Cabbage rolls can be finicky to make.  Instead of making them each time we want to eat some, I make up a bunch at once and freeze them.  Then it is easy to have cabbage rolls whenever the mood strikes you.

I prepare the cabbage in the fall when I have a crop ready.  First you pick nice firm heads, remove the outer damaged leaves, cut out the core and wash.  I blanch the whole head and then immerse it in icy cold water.  Drain well before freezing until needed.


When I am making cabbage rolls, I usually bring out a number of heads at once.  Thaw completely and drain.


I find this works best for having pliable leaves.  I've tried freshly blanched leaves but they are easier to tear and not as nice to work with.  The freezing process seems to do something to the cabbage so the leaves are bendable and not too fragile.


For the filling I cook 2 to 3 cups of rice and fry several pounds of hamburger before mixing together.  Salt and pepper to taste.  Amounts don't matter as leftovers can be used later.


I peel apart the heads of cabbage and use the smaller or torn pieces for the bottom of the container. 

To make the cabbage roll, place a leaf in your cupped hand.


Place a spoonful of filling near the end closest to your wrist.


Cup your hand and shape the filling into a nice mound.


Roll leaf over filling, tucking in sides as you roll.  Don't be too gentle because if you tuck it too loosely it may fall apart during cooking.


Roll top of leaf over to finish off.  Practice makes perfect but unperfect cabbage rolls still taste great.  :)


I freeze the cabbage rolls in ice cream pails or larger plastic containers.  Since I usually cook the cabbage rolls in my crock pot, I find a container that fits nicely in the crockpot.


Pack the cabbage rolls close together with rolled side down. 


When I have enough for a meal I layer on several pieces of wax paper as a divider so I can pry it apart when frozen.  That way I can freeze several meals in one container.


Continue filling and end with broken pieces again.  This way, you flip it to the bottom of the crockpot when frozen and have a layer of leaves on the bottom.


If you are cooking them fresh, you can cook them in a roaster instead of a crockpot.  Fill the roaster as above without the wax paper.  You can use crushed canned tomatoes or partially diluted tomato soup (I mix a can of soup with 1/2 can of water).


Cook at 350°F for 1 to 2 hours.  Cabbage should cut easily with a fork.


When I bring the frozen cabbage rolls out to cook, I place them cabbage pieces side down in a crockpot.  I add 1 to 2 cans of tomato soup depending on the amount of cabbage rolls I am cooking.  I again dilute it with 1/2 can water per can of soup.  I then cook on high all day until supper.  If you cook fresh cabbage rolls in the crockpot, it doesn't take as long since they don't have to thaw.


If I have rice-hamburger filling left, I mix in a can of tomato soup and top with cheddar cheese.  Bake at 350°F for about 3/4 hour until heated through and cheese is melted and browned. 


My mom does her cabbage rolls differently.  She uses raw rice and raw hamburger in hers.  She also often buys sour cabbage to roll them in.  She cooks hers on the top of the stove in a large pot.  She puts an old plate on the bottom of the pot so the cabbage rolls don't stick and burn.  Then mom covers them with tomato juice and boils them slowly for several hours.  I don't use this method because: 1. they may boil over (big mess), 2. I don't use enough juice so they are dry, 3. I don't cook them long enough so they are partially raw.  Mom has perfected this method over the years and hers are always tasty but I prefer my method.
Enjoy one or more of these ideas.  ;)