Thursday, May 24, 2012

Cabbage Rolls

Cabbage rolls can be finicky to make.  Instead of making them each time we want to eat some, I make up a bunch at once and freeze them.  Then it is easy to have cabbage rolls whenever the mood strikes you.

I prepare the cabbage in the fall when I have a crop ready.  First you pick nice firm heads, remove the outer damaged leaves, cut out the core and wash.  I blanch the whole head and then immerse it in icy cold water.  Drain well before freezing until needed.


When I am making cabbage rolls, I usually bring out a number of heads at once.  Thaw completely and drain.


I find this works best for having pliable leaves.  I've tried freshly blanched leaves but they are easier to tear and not as nice to work with.  The freezing process seems to do something to the cabbage so the leaves are bendable and not too fragile.


For the filling I cook 2 to 3 cups of rice and fry several pounds of hamburger before mixing together.  Salt and pepper to taste.  Amounts don't matter as leftovers can be used later.


I peel apart the heads of cabbage and use the smaller or torn pieces for the bottom of the container. 

To make the cabbage roll, place a leaf in your cupped hand.


Place a spoonful of filling near the end closest to your wrist.


Cup your hand and shape the filling into a nice mound.


Roll leaf over filling, tucking in sides as you roll.  Don't be too gentle because if you tuck it too loosely it may fall apart during cooking.


Roll top of leaf over to finish off.  Practice makes perfect but unperfect cabbage rolls still taste great.  :)


I freeze the cabbage rolls in ice cream pails or larger plastic containers.  Since I usually cook the cabbage rolls in my crock pot, I find a container that fits nicely in the crockpot.


Pack the cabbage rolls close together with rolled side down. 


When I have enough for a meal I layer on several pieces of wax paper as a divider so I can pry it apart when frozen.  That way I can freeze several meals in one container.


Continue filling and end with broken pieces again.  This way, you flip it to the bottom of the crockpot when frozen and have a layer of leaves on the bottom.


If you are cooking them fresh, you can cook them in a roaster instead of a crockpot.  Fill the roaster as above without the wax paper.  You can use crushed canned tomatoes or partially diluted tomato soup (I mix a can of soup with 1/2 can of water).


Cook at 350°F for 1 to 2 hours.  Cabbage should cut easily with a fork.


When I bring the frozen cabbage rolls out to cook, I place them cabbage pieces side down in a crockpot.  I add 1 to 2 cans of tomato soup depending on the amount of cabbage rolls I am cooking.  I again dilute it with 1/2 can water per can of soup.  I then cook on high all day until supper.  If you cook fresh cabbage rolls in the crockpot, it doesn't take as long since they don't have to thaw.


If I have rice-hamburger filling left, I mix in a can of tomato soup and top with cheddar cheese.  Bake at 350°F for about 3/4 hour until heated through and cheese is melted and browned. 


My mom does her cabbage rolls differently.  She uses raw rice and raw hamburger in hers.  She also often buys sour cabbage to roll them in.  She cooks hers on the top of the stove in a large pot.  She puts an old plate on the bottom of the pot so the cabbage rolls don't stick and burn.  Then mom covers them with tomato juice and boils them slowly for several hours.  I don't use this method because: 1. they may boil over (big mess), 2. I don't use enough juice so they are dry, 3. I don't cook them long enough so they are partially raw.  Mom has perfected this method over the years and hers are always tasty but I prefer my method.
Enjoy one or more of these ideas.  ;)


Monday, May 21, 2012

Pruning the Cedar Hedge

This spring we decided that the cedar hedge needed pruning.  We haven't touched it since we moved here and it is getting taller and taller.  It also seems that it is getting thinner in spots.  We decided to top off the hedge so our view across the river isn't completely blocked.  Hopefully it will also help the hedge from getting more thin spots.

Here you can see the hedge as it was before trimming.  Some people also trim the sides so they are straight and regimental.  We like the natural curves of the cedars.


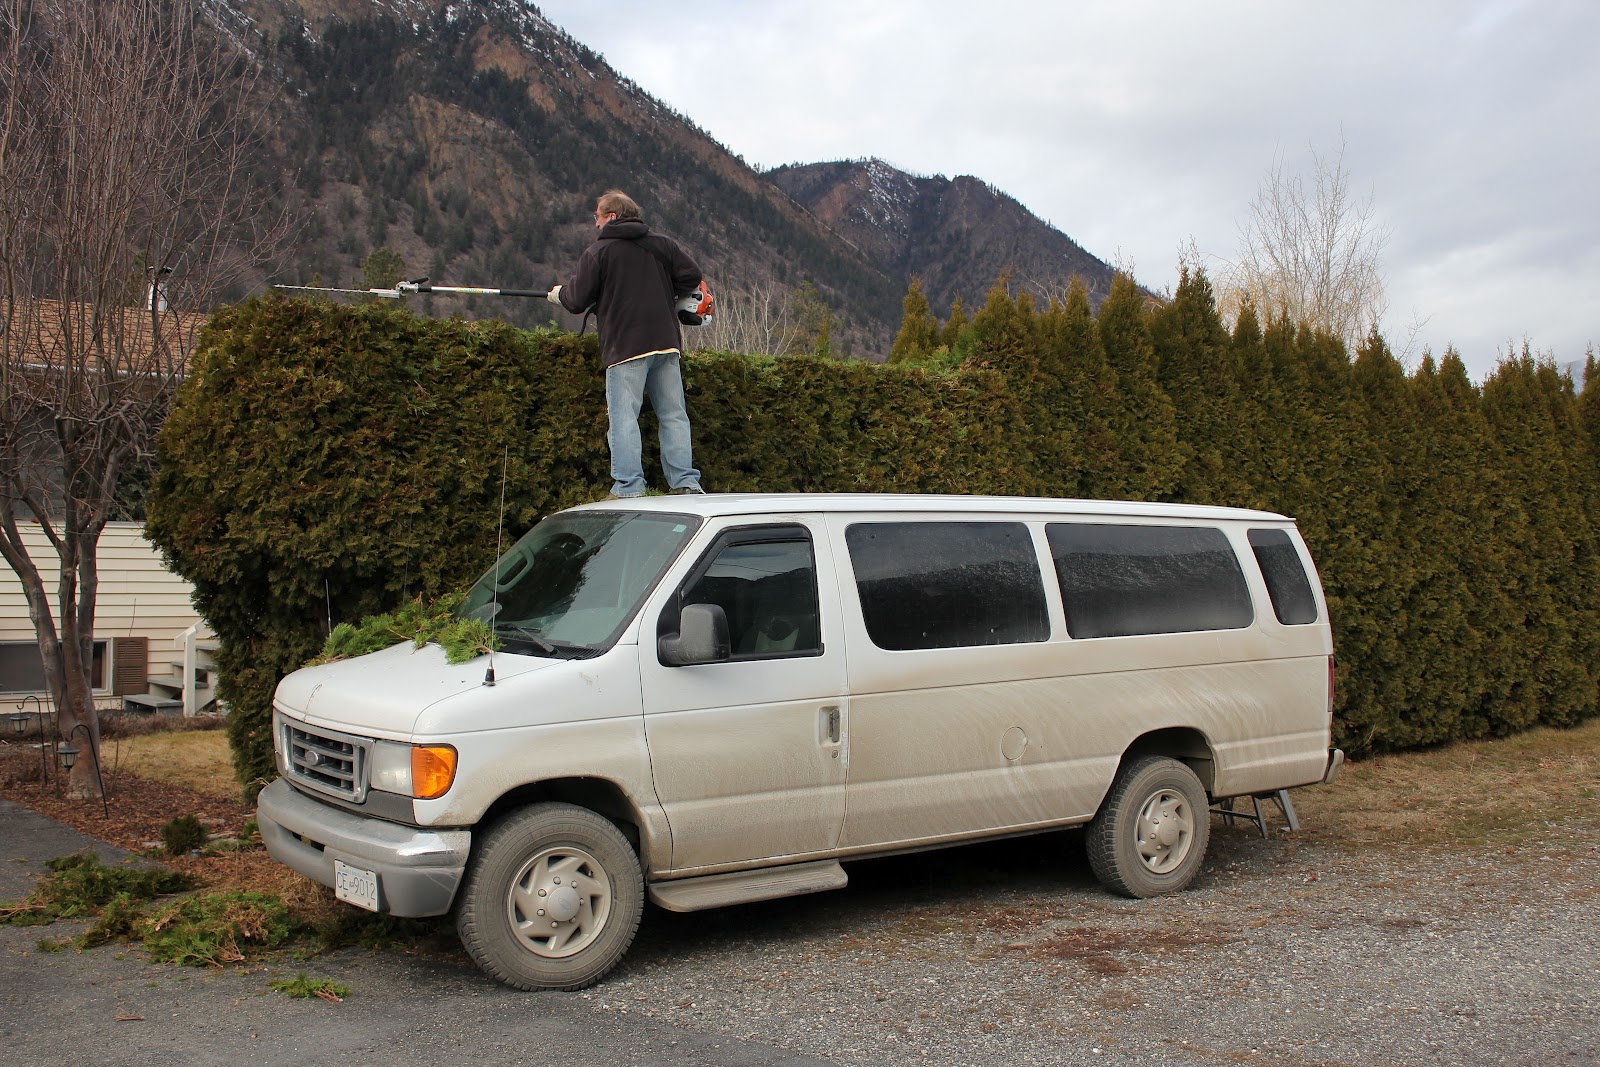
We bought  a gas-powered trimmer so we don't have to worry about long extension cords.  Barry found that standing on the van was the right height without having to move the ladder so often.


We only trimmed around 2 feet off the top.  We may shorten it more next year but decided that this was enough for this year.


Standing on the van worked great along the driveway and out front but for the rest of the hedge a ladder was used.  The bad thing about using the van was when it was cooler and damp, it was too slippery to stand on.


Now we can see the highway across the Fraser Valley from our front window again.  Plus I think the hedge looks much neater looking.


Thursday, May 17, 2012

Volunteer Spinach

I was going to collect seed from my spinach last year but got sidetracked and it didn't get done.  I ended up feeding the old plants to the chickens.  They love fresh greens of any kind.

This spring, I noticed I had some volunteer spinach growing along the sidewalk.  I left them for Lulu to nibble on as she wandered past.  I also thought it might keep her away from the other plants growing in the garden.  Wrong!  She'll eat a side of spinach before moving over to the tiny cabbage and bok choi plants for a leaf or two - unfortunately for those plants, a leaf or two is most of the plant.  :(


Since the spinach has been doing so well, I decided Lulu could share her bounty with us.


I recently got a steamer and decided to try cooking some spinach.  Yum!  It was so tender and much easier to cook than boiling it in a pot and having to try to turn the spinach so it all gets done at the same time.  We ate it straight from the steamer with a drizzle of vinegar.  (Sorry no pics as I forgot to snap some before we ate it all.)


I also made a spinach salad that I regularly made in the past.  Again no pics but it is not hard to make.  Chop 1/2 pound of bacon and fry until done.  Boil several eggs, peel and slice.  Slice some mushrooms.  Wash spinach and rip into bite-sized pieces.  Place spinach in bowl and sprinkle on bacon bits.  Add egg and mushroom slices.  Drizzle on ranch dressing.  Enjoy!


Monday, May 14, 2012

Potato Frittata

I am not fond of quiche because I find it too rich with the eggs, the filling and crust.  I decided to try a frittata which seemed to me to be a crustless quiche.  I combined the two recipes below and made some of my own changes.

http://www.cheapcooking.com/Recipes/eggs/frittata.html   http://allrecipes.com/recipe/potato-and-cheese-frittata/

Ingredients
2 Tbsp oil
1 - 2 potatoes, peeled and thinly sliced
1/2 onion, chopped
4 eggs
1/2 c grated cheddar cheese
1/4 c grated Parmesan cheese
paprika
chili powder
salt
pepper


Heat oven to 400°F.

If potatoes are large, half or quarter them and then sliced them into thin slices.  Chop onion.


Brown potatoes and onions in oil.  I used a cast iron pan so I could use it in the oven.


Turn occasionally until potatoes are nicely browned.


Beat eggs with salt, pepper and spices.  I used a pinch of chili powder and some paprika.


Add eggs to pan with potatoes and onions.


Place pan in oven and cook for about 10 minutes or until eggs are firm.


Sprinkle on cheese (I used both cheddar and Parmesan) and return to oven for about 5 minutes or until cheese is melted.


Remove from oven.


Cut into quarters and serve.  It was very tasty.  We tried it with salsa, ketchup and also sour cream.  All three condiments work well with the frittata.


I would make it again and try other additions to the potato and onion.  Bacon chopped and fried would a nice addition as would mushrooms or peppers.  It would also work at lunch with a salad or a side of refried beans.  Experiment and enjoy!  ;)

Thursday, May 10, 2012

Lulu Lays Large Eggs

Lulu started laying eggs again after she finished molting a couple months ago.  We can tell when she's going to lay because she eats crushed egg shells.  I bought oyster shell to make sure the chickens got enough calcium to lay eggs with strong shells.  Lulu never was interested in the oyster shell and her eggs sometimes had weak shells.  I was afraid of her breaking an egg inside herself and having troubles so I keep a dish of crushed egg shells by her food to provide her with calcium.  Lulu usually eats them the day before she lays.


Here is Lulu's nesting box set in the corner of the closet.  When we travelled to my mom's birthday, we took it with us and set it on the floor in the back of the van.  When Lulu needed to lay an egg she would jump off the seat and settle in her nesting box.  She usually didn't like to lay while the van was moving so she would sit there and wait until we stopped the van for a meal or a break.  We had a blanket on the seat that hung down almost to the floor.  Lulu would pull the blanket over herself when she was in the nesting box so we couldn't see her.  I guess she likes her privacy.


Here is Lulu in her nesting box.  Note the awful wallpaper behind her.  When we moved here several years ago, the house was mostly panelling and loud wallpaper.  I've been stripping paper and painting every winter and was going to do the kitchen this winter until I broke the bone in my foot.  Oh well, next year.


Lulu sings her egg song before she climbs into the box.  Most chickens sing when they are finished but she likes to announce that she's going to lay.  She'll announce she's coming into the house even before she climbs the stairs.  Once in the house, she lets us know she's on her way to her nesting box.


She is very nosy and has been known to get out of the nesting box to check on what I'm doing if I happen to be in the kitchen out of her sight.  She'll squawk a bit, eat a bit and head back into the box to finish her job.  After she lays her egg, she'll often go back in again after awhile as if she is going to lay a second egg.  We're not sure why she does this, but she goes back more times than she doesn't.  We call it "Lulu laying her phantom or invisible eggs again."


Once Lulu started laying again, she was laying about 3 to 5 eggs a week.  While we were gone for those 10 days, Lulu laid an egg every second day.  Then we returned home she stopped completely for over 2 weeks and just started laying again on Monday.  It is as if she didn't have time to lay once she got home as she needed to take many dustbaths and to check out the whole yards.  She had much area to cover - places to scratch, things to eat - a very busy girl!


Lulu's eggs are very large.  They don't fit in an egg carton made for extra-large eggs.  Here are three of her eggs and an extra-large store bought egg.  Sometimes the other chickens would lay large egg that were double yolks, but Lulu's haven't been.  They are just super-duper sized eggs.


Once she lays her egg, she comes looking for treats.  I usually give her some unsalted peanuts which she just gobbles up.  If I don't give her peanuts, she'll stand by the fridge hoping something will jump out for her.  She has me well trained, doesn't she?  ;)
 

Monday, May 7, 2012

The Tulip


The Tulip


Tossing turban style contours,


with an aloofness as one passes by,


Utilizing every charm it possesses,


under a lupin blue cloudless sky,


Like a guardsman, gallantly standing,


holding up his noble head high,


In rainbow colours, brilliant and stately,


a vision to surely yield a sigh,


Ponder thus upon the regal tulip,


it has pure beauty, you cannot deny.


by Ernestine Northover


Thursday, May 3, 2012

Turkey, Black Bean and Corn Casserole

I saw the following recipe in a Campbell's Soup email and it gave me an idea to work with.  The link to the original recipe is here.  Cooking with Campbell's - Black Bean Corn Turkey Chili


Ingredients
1 c dried black beans
1 1/2 c chopped turkey
1 c chopped onion  
1 c shredded carrot
1/2 c chopped celery
1 c kernel corn
1 c chicken broth
1/2 c salsa
1 tbsp chili powder
1 can tomato soup
3/4 c grated mozzarella cheese
3/4 c grated cheddar cheese
 
I used leftover turkey breast instead of the turkey hamburger in the original recipe so that changed everything.
 

I sauteed the onion and celery before mixing it with the grated carrots and frozen corn.


I used my own dried black beans instead of canned.  I washed and sorted the beans and then soaked them overnight.  I drained them and added them to the turkey - veggie mix.


I stirred in the chicken broth and chili powder.


Next I added the condensed soup and the salsa. 


I poured it into a greased casserole dish and baked it for an hour at 350°F.


Remove from oven and sprinkle on the cheese.  First mozzarella.


Then the cheddar. 


Pop back into the oven for 10 minutes for the cheese to melt and start to bubble.


Serve with a side salad and enjoy!


    I found the casserole very tasty but slightly runny.  I had thought I might leave out the broth next time but it was great as leftovers this way.  Often casseroles get too dry when reheated, but this one actually improved as the flavours melded together. 

    You could also add in green peppers.  I'm also toying with the idea of adding rice - I think I would precook the rice first though.  It was a great way to use up leftover turkey and I will be making it again.